Wooden windows are timeless — they bring warmth, character, and charm that modern materials can’t replicate. But even the most beautiful wood frames are vulnerable to one common enemy: rot. Moisture, condensation, and poor maintenance can all cause the wood to deteriorate over time. Left untreated, rot can spread, weaken the frame, and even compromise your home’s energy efficiency.
The good news? You don’t need to replace your entire window. With the right tools and a bit of patience, rotten wooden window frames can be repaired and restored to their former beauty. This guide will walk you through every step — from identifying damage to rebuilding and protecting your windows — ensuring they stay strong and elegant for years to come.
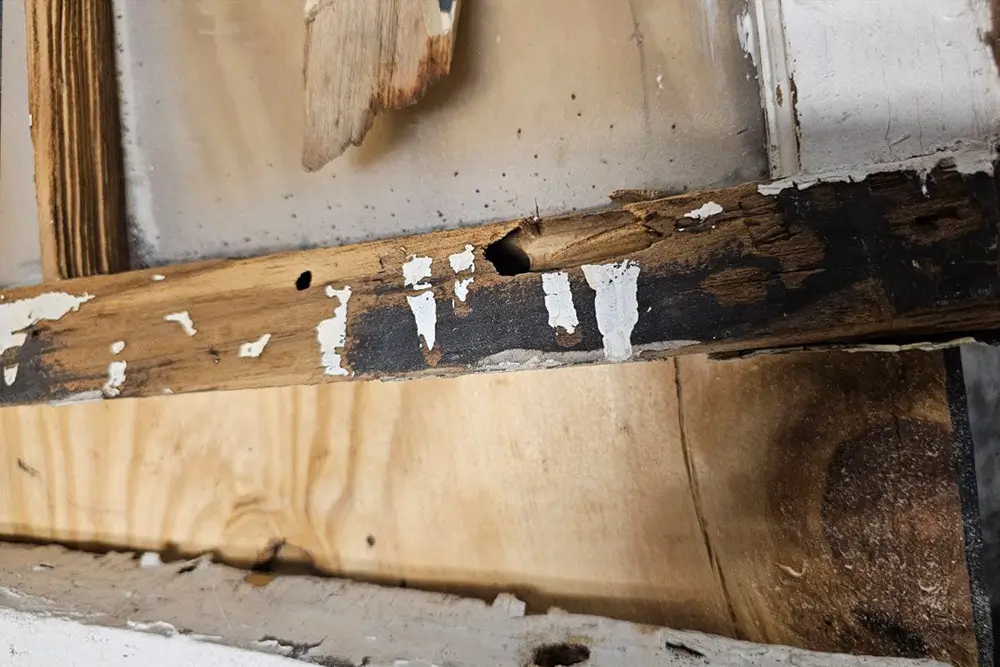
Understanding Wood Rot
Before you begin repairing, it’s important to understand what you’re dealing with. Wood rot is a form of fungal decay that occurs when moisture repeatedly penetrates the surface of wood. There are two main types:
- Wet rot – Develops in persistently damp areas, usually caused by leaks or condensation.
- Dry rot – Caused by a fungus that spreads through the wood fibers, even in drier conditions.
Common signs include:
- Soft, spongy spots on the wood.
- Flaking paint or bubbling around window corners.
- A musty smell or dark discoloration.
- Window frames that feel unstable or distorted.
If left unchecked, rot can spread beyond the window frame to nearby walls or sills — that’s why quick action is essential.
Tools and Materials You’ll Need
Repairing a wooden window frame doesn’t require advanced carpentry skills, but having the right materials makes all the difference. Here’s what you’ll need:
Tools:
- Chisel or scraper
- Putty knife
- Sandpaper (medium and fine grit)
- Drill with a mixing bit
- Clamps (optional, for shaping repairs)
Materials:
- Epoxy wood filler or consolidator
- Wood hardener or preservative
- Paintbrushes
- Primer and exterior paint
- High-quality caulk or sealant
Safety gear:
- Gloves
- Safety glasses
- Dust mask or respirator
Tip: Choose marine-grade epoxy filler for outdoor use — it resists moisture better and provides a longer-lasting repair.
Step 1: Inspect and Identify the Damage
Start by inspecting the entire window frame — inside and out. Pay special attention to the bottom corners, sills, and joints, where water tends to collect.
Use a screwdriver or small knife to gently press into the wood.
- If the tool sinks easily, the wood is rotten.
- If it feels firm but slightly discolored, the issue might just be surface-level.
Determine whether the damage is localized (a few inches) or structural (affecting the frame’s integrity).
If the rot extends deep into the joints or sash, it’s best to call a professional for a more extensive restoration.
Before starting the repair, make sure you’ve addressed the source of moisture — otherwise, the problem will return. Check for poor caulking, leaky gutters, or missing paint protection.
Step 2: Remove the Rotten Wood
Once you’ve identified the damaged areas, it’s time to carefully remove all the rot.
Use a chisel or scraper to carve out the decayed wood until only solid, healthy material remains. Be thorough — leaving even a small amount of rot behind can allow it to spread again.
- Clean the area with a dry cloth or vacuum to remove loose particles.
- If the damaged section is large, consider using a small saw to cut away the affected piece.
- Avoid cutting too deep; the goal is to keep as much original wood as possible.
After removal, you’ll see a rough cavity — this is where you’ll rebuild the missing section using an epoxy filler or wood patch.
Step 3: Treat the Remaining Wood
Before filling the cavity, treat the exposed area with a wood preservative or hardener. This stops the spread of any hidden fungal spores and strengthens the surrounding fibers.
Apply the treatment generously with a brush and allow it to soak for several hours. Once it dries completely, the wood will become harder and more resistant to future decay.
For deep or porous wood, a liquid consolidator is ideal — it penetrates deeply, binding loose fibers and preparing the surface for epoxy application.
Step 4: Fill and Rebuild the Frame
Now that the rot has been completely removed and the remaining wood treated, it’s time to restore the frame’s shape and strength.
- Mix and apply the epoxy filler.
- Follow the manufacturer’s instructions to combine the resin and hardener. The texture should be similar to thick putty.
- Use a putty knife to press the epoxy into the cavity.
- Slightly overfill the area, as epoxy can shrink while curing.
- Shape the filler to match the original contour of the frame.
- Let it cure.
- Allow the epoxy to harden fully. Depending on the product, this can take anywhere from a few hours to overnight.
- Sand the surface.
- Once hardened, sand the repaired section smooth using medium-grit sandpaper, then finish with a finer grit. The goal is to make the new surface blend seamlessly with the old wood.
- Inspect your work.
- Run your hand along the repaired area. It should feel firm, even, and continuous with the surrounding frame. If needed, apply a second thin layer of epoxy for final refinishing.
This process not only restores the original look of your wooden window frame, but also adds strength that often exceeds that of natural wood.
Step 5: Prime, Paint, and Seal
With the repair completed, protection is the next vital step. Proper sealing and painting will ensure your work lasts for many years.
- Apply a high-quality wood primer.
- Primer helps seal the wood grain and improves paint adhesion. Choose a mildew-resistant formula for outdoor windows.
- Paint with weatherproof paint.
- Use two coats of durable exterior-grade paint to protect against moisture, UV light, and temperature changes.
- For a natural look, consider finishing with a wood stain followed by a clear marine varnish.
- Seal every joint and edge.
- Apply caulk or silicone sealant along seams, corners, and where the frame meets the wall.
- Proper caulking prevents water infiltration — the main cause of future rot.
After finishing, your wooden window frame repair should look as good as new, with no visible seams or color variations.
Step 6: Prevent Future Rot
Repairing rot is only part of the job. To extend the life of your windows, regular maintenance is essential.
Here are a few proven window maintenance tips:
- Inspect annually: Check paint, caulking, and wood surfaces at least once a year.
- Repaint every 3–5 years: Fresh paint provides a strong barrier against moisture.
- Clean window sills regularly: Dust and dirt trap water and promote decay.
- Check drainage paths: Make sure rainwater can flow freely away from your window sills.
- Control humidity indoors: Use dehumidifiers or proper ventilation to reduce condensation.
These simple actions can prevent rot from reappearing and help your windows remain beautiful and functional for decades.
When to Call a Professional
While small repairs are manageable for experienced homeowners, extensive rot often requires expert help.
You should contact a professional window restoration specialist if:
- The damage extends deeper than 1 inch into the wood.
- The sash or sill is structurally compromised.
- There is visible mold or water infiltration into adjacent walls.
- The window belongs to a historic property where original materials must be preserved.
Professionals use industrial-grade epoxies, precision tools, and moisture-testing equipment to ensure long-lasting results.
Companies like Artan Window Solutions specialize in wood window frame restoration, offering both repair and refinishing services that maintain authenticity while improving durability.
Conclusion
Rotten wooden windows don’t necessarily mean replacement. With the right tools, materials, and technique, you can restore damaged wood frames and bring your windows back to life — saving both money and heritage value.
By understanding the causes of rot, performing timely maintenance, and applying proper restoration techniques, you’ll preserve the charm and integrity of your home for many years.
If you’re unsure where to start or the damage seems severe, trust the experts.
A professional team can assess, repair, and protect your wooden windows with precision — ensuring beauty, durability, and efficiency all year round.